


1 搭建三节点操作系统
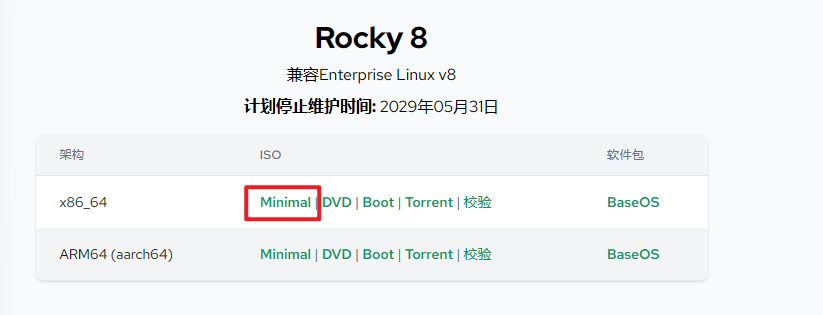
选择的是Rocky8.8操作系统,官方下载地址:下载 Rocky | Rocky Linux(下载Minimal即可,下载缓慢可以复制下载链接至迅雷下载)
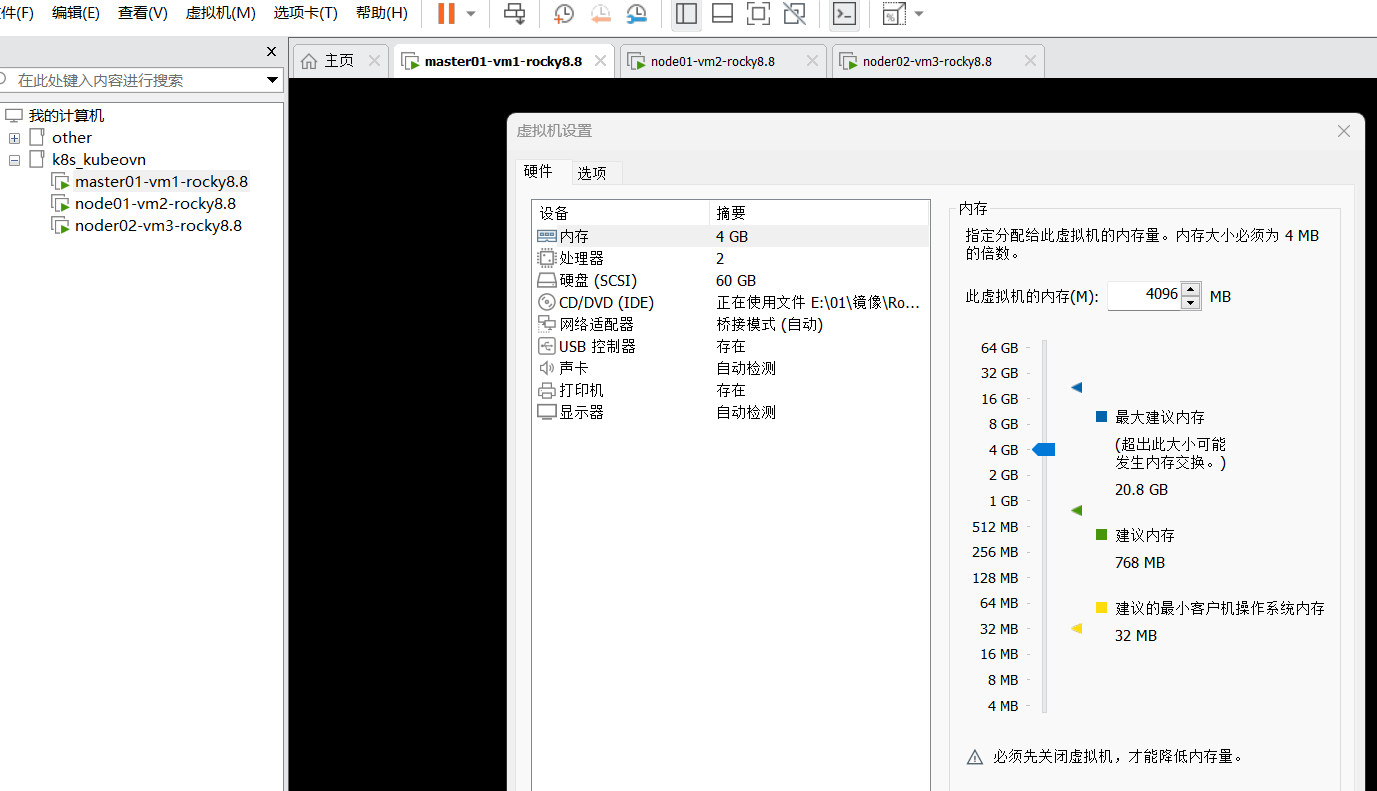
搭建环境配置见下图,三节点配置相同。
 可配置中国科大Rocky8镜像源,方便下载一些软件,参考:Rocky Linux 源使用帮助 — USTC Mirror Help 文档
可配置hosts文件
可配置中国科大Rocky8镜像源,方便下载一些软件,参考:Rocky Linux 源使用帮助 — USTC Mirror Help 文档
可配置hosts文件
[root@master01 k8s]# cat /etc/hosts
127.0.0.1   localhost localhost.localdomain localhost4 localhost4.localdomain4
::1         localhost localhost.localdomain localhost6 localhost6.localdomain6
192.168.137.9 master01
192.168.137.157 node01
192.168.137.161 node02
2 安装docker
可参考清华镜像源:docker-ce | 镜像站使用帮助 | 清华大学开源软件镜像站 | Tsinghua Open Source Mirror
yum remove docker \
                  docker-client \
                  docker-client-latest \
                  docker-common \
                  docker-latest \
                  docker-latest-logrotate \
                  docker-logrotate \
                  docker-engine
yum install -y yum-utils
官网docker-ce.repo文件内容为:
[docker-ce-stable]
name=Docker CE Stable - $basearch
baseurl=https://download.docker.com/linux/centos/$releasever/$basearch/stable
enabled=1
gpgcheck=1
gpgkey=https://download.docker.com/linux/centos/gpg

[docker-ce-stable-debuginfo]
name=Docker CE Stable - Debuginfo $basearch
baseurl=https://download.docker.com/linux/centos/$releasever/debug-$basearch/stable
enabled=0
gpgcheck=1
gpgkey=https://download.docker.com/linux/centos/gpg

[docker-ce-stable-source]
name=Docker CE Stable - Sources
baseurl=https://download.docker.com/linux/centos/$releasever/source/stable
enabled=0
gpgcheck=1
gpgkey=https://download.docker.com/linux/centos/gpg

[docker-ce-test]
name=Docker CE Test - $basearch
baseurl=https://download.docker.com/linux/centos/$releasever/$basearch/test
enabled=0
gpgcheck=1
gpgkey=https://download.docker.com/linux/centos/gpg

[docker-ce-test-debuginfo]
name=Docker CE Test - Debuginfo $basearch
baseurl=https://download.docker.com/linux/centos/$releasever/debug-$basearch/test
enabled=0
gpgcheck=1
gpgkey=https://download.docker.com/linux/centos/gpg

[docker-ce-test-source]
name=Docker CE Test - Sources
baseurl=https://download.docker.com/linux/centos/$releasever/source/test
enabled=0
gpgcheck=1
gpgkey=https://download.docker.com/linux/centos/gpg

[docker-ce-nightly]
name=Docker CE Nightly - $basearch
baseurl=https://download.docker.com/linux/centos/$releasever/$basearch/nightly
enabled=0
gpgcheck=1
gpgkey=https://download.docker.com/linux/centos/gpg

[docker-ce-nightly-debuginfo]
name=Docker CE Nightly - Debuginfo $basearch
baseurl=https://download.docker.com/linux/centos/$releasever/debug-$basearch/nightly
enabled=0
gpgcheck=1
gpgkey=https://download.docker.com/linux/centos/gpg

[docker-ce-nightly-source]
name=Docker CE Nightly - Sources
baseurl=https://download.docker.com/linux/centos/$releasever/source/nightly
enabled=0
gpgcheck=1
gpgkey=https://download.docker.com/linux/centos/gpg
网络连接docker官网不通的情况下,可手动在/etc/yum.repos.d/ 目录下创建 docker-ce.repo文件,复制上述内容,执行以下内容,进行地址替换:
sed -i 's+https://download.docker.com+https://mirrors.tuna.tsinghua.edu.cn/docker-ce+' /etc/yum.repos.d/docker-ce.repo
最后安装
yum install docker-ce docker-ce-cli containerd.io docker-buildx-plugin docker-compose-plugin
配置镜像加速,可参考中国科大镜像源(Docker Hub 源使用帮助 — USTC Mirror Help 文档)或者阿里镜像源(容器镜像服务 (aliyun.com))
sudo mkdir -p /etc/docker
sudo tee /etc/docker/daemon.json <<-'EOF'
{
  "registry-mirrors": ["https://ymjcp0nc.mirror.aliyuncs.com"]
}
EOF
sudo systemctl daemon-reload
sudo systemctl restart docker
设置自启
systemctl enable docker
以上内容三节点均需配置
3 使用KubeKey安装三节点集群(网络插件kubeovn)
官网操作参考:多节点安装 (kubesphere.io) 本次安装,实际信息如下(ip信息每个人不同):
| 主机 IP | 主机名 | 角色 |
|---|---|---|
| 192.168.137.9 | master01 | control plane, etcd |
| 192.168.137.157 | node01 | worker |
| 192.168.137.161 | node02 | worker |
三节点安装相关依赖项
yum install openssl tar -y
yum install socat conntrack ebtables ipset -y
以下操作均在 master01节点 执行
export KKZONE=cn
curl -sfL https://get-kk.kubesphere.io | VERSION=v3.0.7 sh -
网络不好的情况下,可以手动下载脚本,
export KKZONE=cnexport VERSION=v3.0.7,执行完这两条命令,手动执行脚本进行下载kk。
./kk create config --with-kubernetes
生成默认配置文件 config-sample.yaml,修改spec.hosts spec.roleGroups为实际规划的IP地址,用户名密码,控制节点工作节点名称,修改spec.network.plugin为kubeovn(这一步也可参考:使用 KubeKey 安装部署 Kubernetes 与 Kube-OVN (kubesphere.io))
apiVersion: kubekey.kubesphere.io/v1alpha2
kind: Cluster
metadata:
  name: sample
spec:
  hosts:
  - {name: master01, address: 192.168.137.9, internalAddress: 192.168.137.9, user: root, password: "lixx"}
  - {name: node01, address: 192.168.137.157, internalAddress: 192.168.137.157, user: root, password: "lixx"}
  - {name: node02, address: 192.168.137.161, internalAddress: 192.168.137.161, user: root, password: "lixx"}
  roleGroups:
    etcd:
    - master01
    control-plane:
    - master01
    worker:
    - node01
    - node02
  controlPlaneEndpoint:
    ## Internal loadbalancer for apiservers
    # internalLoadbalancer: haproxy

    domain: lb.kubesphere.local
    address: ""
    port: 6443
  kubernetes:
    version:
    clusterName: cluster.local
    autoRenewCerts: true
    containerManager:
  etcd:
    type: kubekey
  network:
    plugin: kubeovn
    kubePodsCIDR: 10.233.64.0/18
    kubeServiceCIDR: 10.233.0.0/18
    ## multus support. https://github.com/k8snetworkplumbingwg/multus-cni
    multusCNI:
      enabled: false
  registry:
    privateRegistry: ""
    namespaceOverride: ""
    registryMirrors: []
    insecureRegistries: []
  addons: []
修改完配置文件后,最后执行(注意确保环境变量还在生效,如不确定可再次执行export KKZONE=cn)
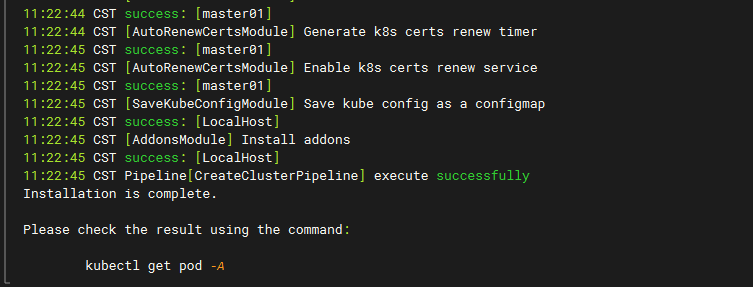
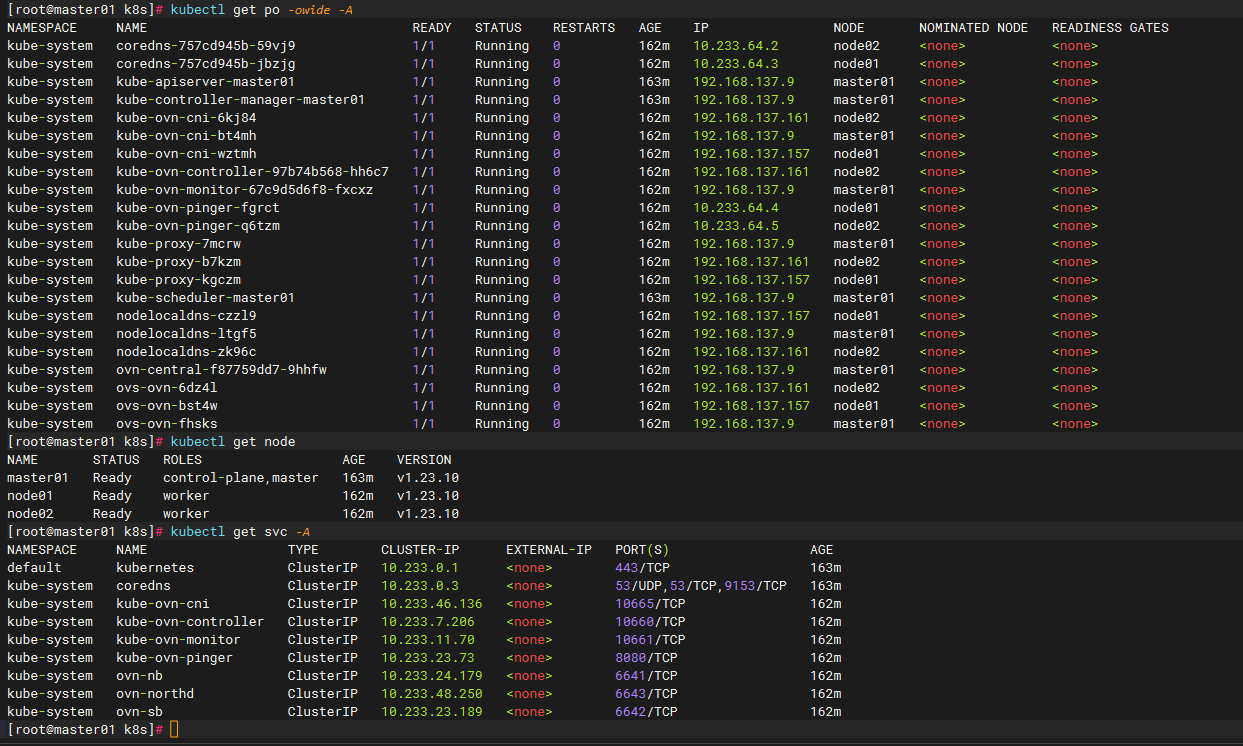
./kk create cluster -f config-sample.yaml
正常完成如下图:
评论